User:Sanust/Guides/Firewall
- I will write the Chinese guides first and then translate it into English. --Sanust
![]() Fire Wall is a extremely powerful magic in PVE.
Fire Wall is a extremely powerful magic in PVE.
Undoubtedly, ![]()
![]()
![]() Luna the Elementalist, who has the Fire Wall specialty, is the best choice for using this spell - she can double the damage.
Luna the Elementalist, who has the Fire Wall specialty, is the best choice for using this spell - she can double the damage.
This guide focuses on using Luna starting with ![]() Conflux town to clear monsters by
Conflux town to clear monsters by ![]()
![]()
![]()
![]() Pixie and Sprite and Fire Wall. It is particularly important to note that when using Luna for monster clearing,
Pixie and Sprite and Fire Wall. It is particularly important to note that when using Luna for monster clearing, ![]()
![]() Sprite should be used whenever possible.
Sprite should be used whenever possible.
This guide ONLY teaches you how to use Fire Wall in the Shadow of Death ![]() ,and assuming that all the troops are NOT affected by morale and luck.
,and assuming that all the troops are NOT affected by morale and luck.
BEFORE CONTINUING TO READ, PLEASE ENSURE YOU HAVE READ AND UNDERSTOOD THE INFORMATION ABOVE.
Basic Data[edit | hide | hide all]
Fire Wall always lasts for exactly 2 rounds, regardless of the hero's ![]() Fire Magic secondary skill level. Heroes without or with Basic Fire Magic can cast a two-hex wall (shaped like "/"), while those with Advanced or Expert Fire Magic can cast a three-tile wall (shaped like ">").
Fire Magic secondary skill level. Heroes without or with Basic Fire Magic can cast a two-hex wall (shaped like "/"), while those with Advanced or Expert Fire Magic can cast a three-tile wall (shaped like ">").
| Fire Magic | Duration | Hex | Base Damage | SP |
|---|---|---|---|---|
| None | 2 Rounds | 2(/) | 10 + P * 10 | 8 |
| Basic | 2 Rounds | 2(/) | 10 + P * 10 | 6 |
| Advanced | 2 Rounds | 3(>) | 20 + P * 10 | 6 |
| Expert | 2 Rounds | 3(>) | 50 + P * 10 | 6 |
![]()
![]()
![]() Luna the Elementalist's specialty doubles the base damage. If she has
Luna the Elementalist's specialty doubles the base damage. If she has ![]() Sorcery, an additional 15% is applied after the specialty multiplier. If she possesses the
Sorcery, an additional 15% is applied after the specialty multiplier. If she possesses the ![]() Orb of Tempestuous Fire, a further 50% bonus is applied after
Orb of Tempestuous Fire, a further 50% bonus is applied after ![]() Sorcery calculation.
Sorcery calculation.
Turn Order[edit | hide]
- Units with higher speed act first.
- No consecutive turns for same speed: If both sides have units of the same speed, units from the same side cannot act consecutively.
- Units in front act first: Units in earlier positions (from slot 1 to slot 7) act before those in later positions.
The unit position order within the Creature Bank will be shown in their respective sections below.
Pathfinding[edit | hide]


When a unit takes its turn, if it wants to move to a certain tile, how does it plan its route? The following rules explain how the AI calculates pathfinding on the battlefield.
Rule 1: The Shortest Path Principle[edit | hide]
A unit will always choose the shortest path to reach its target. As a result, the unit would minimize turns whenever possible.
It's worth noting that the AI initially only calculates the shortest straight-line path, ignoring obstacles.
- For more details, see Example 2 below.
Rule 2: The Hexagonal Principle[edit | hide]
The battlefield in Heroes III is designed as a hexagonal grid, similar to a chessboard, which results in units' attack ranges also being presented in hexagonal patterns.
In the example shown, for the ![]()
![]() Battle Dwarf, all the green-highlighted hexes represent equally short paths.
Battle Dwarf, all the green-highlighted hexes represent equally short paths.
- If the battlefield is large enough, the theoretical maximum movement range for
 Arch Devil would form a hexagon with a radius (r) of 17.
Rule 3: The Coordinate Priority Principle[edit | hide]
When multiple shortest paths exist, the game then determines the final choice based on coordinate priority.
Using the starting tile as the origin, draw rays in six directions to establish a six-quadrant coordinate system. Following The Shortest Path Principle, the monster's movement order is determined by quadrant priorities numbered 1 to 6.
Provided The Shortest Path Principle is satisfied, if the tile in the direction of the current highest priority is blocked and thus inaccessible, the unit will consider the tile corresponding to the next priority direction. Moreover, each time the unit moves to a new target hex, it re-establishes the six-directional coordinate system relative to that individual hexagon.
Rule 4: The Flying Principle[edit | hide]
Flying units follow The Shortest Path Principle: "the shortest distance between two points is a straight line" and do not calculate the hexagonal grid along the path. They only consider the final destination tile.
Examples[edit | hide]
- In Example 1, the
 Familiar moves upward along the right edge of the battlefield.
- The direction with priority 1 becomes inaccessible due to the boundary obstruction. Following The Shortest Path Principle, the unit will instead move one tile in the priority 6 direction, because following in priority 4 or 5 direction would make the Familiar move more tiles that following in priority 6 direction.
- Upon reaching this new tile, it re-establishes the coordinate system centered on that hex. At this point, the direction with priority 1 becomes accessible again, so the Familiar moves one tile in that direction.
- In this manner, repeating the process, the Familiar continues its movement until it reaches the desired destination.
- As a result, the Familiar moves in 6-1-6-1-6.
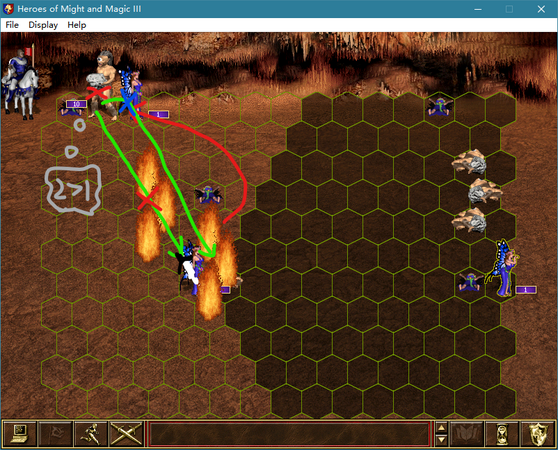
- In Example 2, the Familiar (on the left) moves towards enemy's Familiar (on the right). How does it move?
- Yellow or Black path seems to be a good choice because the first step is to move in the direction of priority 1. However, Yellow or Black path is 7 tiles long, while the Green and Red paths would only require 6 tiles if there were no obstacles, it does not satisfy The Shortest Path Principle. Therefore, the AI will prioritize the Red and Green paths.
- Due to the obstacle in the direction of priority 2, the Familiar can only move one step in the direction of priority 3, and then re-establishes the coordinate system at that new tile.
- At this new position, the direction of priority 1 is again blocked, so it moves one step in the direction of priority 2.
- It then moves one tile in the direction of priority 1, and proceeds along the path where Green and Yellow overlap until it reaches the enemy.
- As a result, the Familiar moves in blue path.
-
 Example 1: The Familiar moves in 6-1-6-1-6.
 -
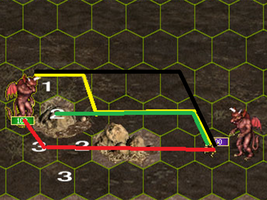 Example 2: How does the Familiar move?
 -
 Example 2 Answer: The Familiar moves in blue path.


Target Selection (TODO)[edit | hide]
Rule 1: Attack if Possible[edit | hide]
Rule 2: Blind Eyes of Two-hex Creatures[edit | hide]
Rule 3: Positioning Value and Melee Value[edit | hide]
Luna the Arsonist[edit | hide]
Now that we understand these AI behaviour theory, we can finally control our arsonist Luna to set fires all over the battlefield.
In this section, we will explain how to use Luna and the Conflux town to defeat guards in Creature Banks early in the game.
We will divide this into two parts: one for Basic Fire Magic and the other for Expert Fire Magic. The former has limited applicability and is more situational, while the latter is more versatile and easier to execute.
Basic Fire Magic[edit | hide]
Not all Creature Banks can be captured using Basic Fire Magic. Below are several feasible examples.
Crypt[edit | hide]

| % | Guards | Content | XP | |||||
| 30 % |
|
1500 |
480 | |||||
| 30 % |
|
2000 |
540 | |||||
| 30 % |
|
2500 Artifact (T) |
750 | |||||
| 10 % |
|
5000 Artifact (T) |
900 |
It should be noted that the examples provided here are relatively extreme; under normal circumstances, the difficulty is not this high, and the losses will generally be smaller.
We will only consider the Crypt with the maximum number of guards, as smaller number of guards counts will be easier to handle. In this situation, the guards are divided into the stacks of:
- A hex: 20
 Skeletons
 - B hex: 20
 Walking Dead
 - C hex: 10
 Wights
 - D hex: 10
 Vampires
The most difficult guardians to deal with are ![]()
![]() Vampires and
Vampires and ![]()
![]() Wights, as they are flying units that can only step on the fire once per turn, and due to their high speed, we must deal with them first.
Wights, as they are flying units that can only step on the fire once per turn, and due to their high speed, we must deal with them first.
However, Crypt is the easiest Creature Bank for Luna, because she could defeat the guards in level 1, ONLY with ![]() Basic Fire Magic and initial primary skills (0
Basic Fire Magic and initial primary skills (0 ![]() Attack skill, 0
Attack skill, 0 ![]() Defense skill, 3
Defense skill, 3 ![]() Power skill, 3
Power skill, 3 ![]() Knowledge skill). The following battles are ALL conducted under this condition.
Knowledge skill). The following battles are ALL conducted under this condition.
Non-dirt[edit | hide]
This battle does not necessarily require ![]()
![]() Sprites, but it must include EXACTLY 3
Sprites, but it must include EXACTLY 3 ![]()
![]() Air Elementals. Additionally, the number of
Air Elementals. Additionally, the number of ![]()
![]() Pixie stacks should not be excessive.
Pixie stacks should not be excessive.
Before the battle, place the main stack of ![]()
![]() Pixies in slot 5, and the
Pixies in slot 5, and the ![]()
![]() Air Elementals in slot 7. Distribute the remaining units by placing one
Air Elementals in slot 7. Distribute the remaining units by placing one ![]()
![]() Pixie in each of the other slots.
Pixie in each of the other slots.
It is worth noting that, unless otherwise specified, units will usually choose to wait and act twice in succession, as both ![]()
![]() Pixies and
Pixies and ![]()
![]() Air Elementals have a speed of 7, which is higher than the fastest guards —
Air Elementals have a speed of 7, which is higher than the fastest guards — ![]()
![]() Vampires — at speed 6.
Vampires — at speed 6.
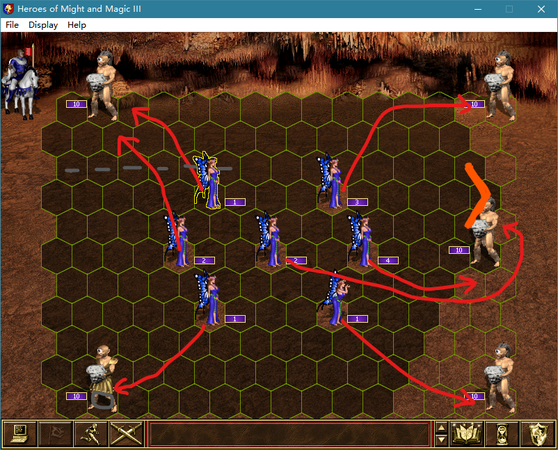
-
 (1.) Upon entering the battlefield, position the Pixie in slot 1 at a location along the left edge of the battlefield—just within the attack range of Vampires. Place the 1st Fire Wall on the only hex the Vampires can land on after moving. Then, move all other units out of the attack range of the Vampires and Wights. According to Attack if Possible rule, Vampires will fly from the top-left corner to the hex with the Fire Wall, take damage, and then kill the Pixie in slot 1.
 -
 (2.) After the enemy's turn, the next step is to make the Wights and Walking Dead each step on the fire once. First, move the main stack upward to safety. This time, place the 2nd Fire Wall on a hex that is just within the Wights' movement range, while also ensuring that the Walking Dead, as they move up to chase the main stack, will pass through and step on the fire. Therefore, place the 2nd Fire Wall at the orange-marked location, and send one Pixie to stand on the blue dot. Since the Wights have higher speed than the Walking Dead, they will act first, fly to the fire, step on it, and then kill the Pixie. When the Walking Dead take their turn, the Wights block their highest-priority direction path, forcing them to detour around the Wights and move upward—causing them to step exactly on the fire.
 -
 (3.) Being burned once deals 80 damage, so the Vampires need to be burned 4 times. First, move the main stack to the upper-right corner. Following the same method as (1.), place the Fire Wall on a hex just within Vampires' reach. Put the 3rd Fire Wall at the orange-marked location, and position one Pixie on the blue dot. This causes Vampires to step on the Fire Wall for the second time, while the Skeletons, chasing the main stack, move toward the upper-right and also step on the fire once.
 -
 (4.) After waiting, the main force acts twice in succession: one Pixie follows the main Pixie stack flying toward the upper-left corner, another one Pixie actively attacks Vampires to prevent the enemy Vampire from acting first in the next turn (which could disrupt the timing of burning it together with the Wights), while the Air Elementals move toward the lower-right corner.
 -
 (5.) The main stack of Pixies successfully reaches the safe upper-left corner, and the Air Elementals reach the designated position in the lower-right corner. The undead moves toward the Air Elementals.
 -
 (6.) After the Air Elementals reach the lower-right corner, place a Fire Wall adjacent to it in the next turn, and have the Air Elementals defend. At the same time, send a single Pixie down to lure the Skeletons and Walking Dead. The Vampires and Wights, acting first, attack the Air Elementals but step on the Fire Wall upon moving in. They also block the path of the Skeletons and Walking Dead who are trying to reach the Air Elementals, so the Skeletons and Walking Dead can only follow the Pixie upward.
 -
 (7.) The Air Elementals continue to defend. Although one will be lost, the Vampires and Wights are perished after stepping on the Fire Wall in place.
 -
 (8.) A single Pixie lures the remaining two enemy stacks toward the upper-right. Meanwhile, the Air Elementals retreat to the left.
 -
 (9.) Next, the Air Elementals regroup with the main stack of Pixies. At the same time, place a Fire Wall at the orange-marked location, and move the single Pixie toward the direction indicated by the blue arrow. Due to The Shortest Path Principle, the Walking Dead step on the Fire Wall twice in succession.
 -
 (10.) Finally, the single Pixie flies to the location indicated by the red arrow. According to The Coordinate Priority Principle, the Walking Dead choose to move in the direction of priority 1 (upper-right), stepping on the Fire Wall twice more and then perishing. The Skeletons, following The Shortest Path Principle, step on the Fire Wall once and also perish. Thus, the battle is won with losses amounting to only 4 Pixies and 1 Air Elemental.


Dirt[edit | hide]
泥地地形亡灵速度+1。气元素只能放3只,且蝴蝶数量不宜过多。此战斗不一定要用蓝蝴蝶。
虽然会损失相较于非泥地的略多一些,但是省下了一次火墙的魔法值。
把大队的蝴蝶放在7号位,气元素放在5号位,1号位放2只蝴蝶,其余各分出来1只。
(详见BV1R4411b77B)
Grass[edit | hide]
事实上,只要是草地带蓝蝴蝶,无论什么英雄都可以做到禁魔下帝王坟。
带30只蓝蝴蝶,其中1号位10个,2号位15个,3号位5个。带其他数量蝴蝶也可以,但蝴蝶总数量不能超过30,且1号位+3号位数量不能超过2号位数量。
(详见BV1WK4y1J7qU)
Expert Fire Magic[edit | hide]
For Expert Fire Magic, all Creature Banks fall into two categories: those with ranged units and those without. The ranged-unit banks have a fixed strategy, while the non-ranged banks share a consistent Fire Wall placement approach.
Cyclops Stockpile and Medusa Stores[edit | hide]

| % | Guards | Content | XP | |||||
| 30 % |
|
4x |
1400 | |||||
| 30 % |
|
6x |
2100 | |||||
| 30 % |
|
8x |
2800 | |||||
| 10 % |
|
10x |
3500 |
| % | Guards | Content | XP | |||||
| 30 % |
|
2000 5 |
500 (520) | |||||
| 30 % |
|
3000 6 |
750 (780) | |||||
| 30 % |
|
4000 8 |
1000 (1040) | |||||
| 10 % |
|
5000 10 |
1250 (1300) |
The following battles MUST be fought using ![]()
![]() Sprites, and have specific requirements regarding Luna's
Sprites, and have specific requirements regarding Luna's ![]() Power skill value. In other words, these battles are more like set patterns or formulas — typically, the guards cannot be defeated unless the exact sequence is followed.
Power skill value. In other words, these battles are more like set patterns or formulas — typically, the guards cannot be defeated unless the exact sequence is followed.
We will use Cyclops Stockpile as an example to demonstrate how to use Fire Wall to defeat ranged units in the Creature Bank, covering both upgraded and non-upgraded stacks. Each group of ranged units must step on the Fire Wall TWICE to perish. Below are the minimum ![]() Power skill value required to defeat the guards in the Cyclops Stockpile and the Medusa Stores.
Power skill value required to defeat the guards in the Cyclops Stockpile and the Medusa Stores.
| Type | Small | Medium | Big | Huge |
|---|---|---|---|---|
| Cyclops Stockpile | 4 2 |
6 6 |
8 9 |
10 13 |
| Medusa Stores | 4 0 |
6 0 |
8 0 |
10 2 |
There is a 50% chance of getting an upgraded stack in the lower left corner (C hex). It should be noted that even if the guards include upgraded stacks, the minimum required Power skill value remains unchanged.
The hero's 7 unit slots MUST be filled with ![]()
![]() Sprites in the following order and quantities: 1, 3, 2, 2, 4, 1, 1. The Fire Wall placement and Sprites' movement MUST strictly follow the procedure outlined below.
Sprites in the following order and quantities: 1, 3, 2, 2, 4, 1, 1. The Fire Wall placement and Sprites' movement MUST strictly follow the procedure outlined below.
-
 (1.) We will first explain using the case with upgraded units. Move the Sprites in the directions indicated by the red arrows in the image, and cast Fire Wall at the orange mark. Note that due to the presence of upgraded units, the Cyclops King in slot 4 will act first, and its maximum movement range is already shown in gray on the map.
 -
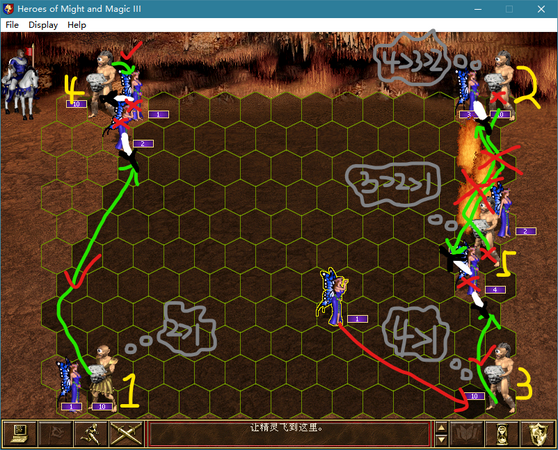 (2.) Now that all the Sprites have completed their actions, it's time for the Cyclops to act. Due to the proximity and the melee engagement value, when they cannot shoot because they are too close to the enemy, they will opt to melee attack the largest number of Sprites stacks they can reach. After this round of actions, the Cyclops in slots 1 and 5 each step on the Fire Walls placed on both sides and perish, and the Cyclops in slot 3 moves to a hex where they will be within range of the initial Fire Wall placement for the next round. Meanwhile, the Cyclops Kings move towards the upper-left corner, setting up an opportunity for the Pixies in the next round to engage both units simultaneously at close range.
 -
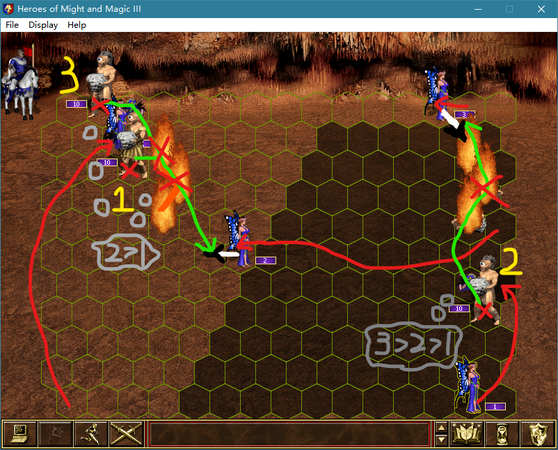 (3.) In the next turn, cast a Fire Wall in the upper-left area, have the single Sprite move adjacent to the Cyclops to engage in melee, and use the larger stacks of Sprites to lure them into stepping on the Fire Wall. By placing just two Fire Walls, all the defending units can be completely eliminated.
 -
 (4.) Next, we explain the case without upgraded units. The Fire Wall placement and movement on the right side of the battlefield in the first round are identical. The difference lies on the left side: a stack of 2 Sprites is used to lure the Cyclops in slot 3, causing it to move toward the priority-1 direction (upper-right) to the farthest extent of its movement range.
 -
 (5.) After the first round, since the Cyclops in slot 3 cannot reach the stack of 3 Sprites, they will instead target the stack of 2 Sprites. Place the second Fire Wall in the lower-right hex relative to them, and position a single Sprite from the right side to engage them in melee. This forces the Cyclops in slot 3, following The Coordinate Priority Principle, to move in the priority-3 direction (lower-right) and step on the Fire Wall twice. Meanwhile, the Cyclops in slot 4, not being engaged in melee, will use their ranged attack to eliminate the stack of 3 Sprites.
 -
 (6.) Finally, we need to place a third Fire Wall to eliminate the remaining Cyclops in slot 4, using a method similar to the previous step. Interestingly, fighting a guard with upgraded units actually consumes less mana and results in fewer perished Sprites than fighting one without upgraded units.


The same method applies to defeating the guards in the Medusa Stores, so it will not be elaborated further here.