Restoration of Erathia Manual Page 41
| Previous page | Next page | Manuals | ||||||||||||||||||||||||||||
|---|---|---|---|---|---|---|---|---|---|---|---|---|---|---|---|---|---|---|---|---|---|---|---|---|---|---|---|---|---|---|
| 1 | 2 | 3 | 4 | 5 | 6 | 7 | 8 | 9 | 10 | 11 | 12 | 1 | Table of contents | 3 | 4 | 5 | 6 | 7 | ||||||||||||
| 8 | 9 | 10 | 11 | 12 | 13 | 14 | 15 | 16 | 17 | 18 | 19 | 20 | 21 | 22 | 23 | 24 | 25 | 26 | 27 | 28 | 29 | 30 | 31 | 32 | 33 | 34 | 35 | 36 | 37 | 38 |
| 39 | 40 | 41 | 42 | 43 | 44 | 45 | 46 | 47 | 48 | 49 | 50 | 51 | 52 | 53 | 54 | 55 | 56 | 57 | 58 | 59 | 60 | 61 | 62 | 63 | 64 | 65 | 66 | 67 | 68 | 69 |
| 70 | 71 | 72 | 73 | 74 | 75 | 76 | 77 | 78 | 79 | 80 | 81 | 82 | 83 | 84 | 85 | 86 | 87 | 88 | 89 | 90 | 91 | 92 | 93 | 94 | 95 | 96 | 97 | 98 | 99 | 100 |
| 101 | 102 | 103 | 104 | 105 | 106 | 107 | 108 | 109 | 110 | 111 | 112 | 113 | 114 | 115 | 116 | 117 | 118 | 119 | 120 | 121 | 122 | 123 | 124 | 125 | 126 | 127 | 128 | 129 | 130 | 131 |
| 132 | 133 | 134 | 135 | 136 | 137 | 138 | 139 | 140 | 141 | 142 | 143 | 144 | Table of contents | 2 | 3 | 4 | 5 | 6 | 7 | 8 | 9 | 10 | ||||||||
| 11 | 12 | 13 | 14 | 15 | 16 | 17 | 18 | 19 | 20 | 21 | 22 | 23 | 24 | 25 | 26 | 27 | 28 | 1 | 2 | Table of contents | 4 | 5 | ||||||||
| 6 | 7 | 8 | 9 | 10 | 11 | 12 | 13 | 14 | 15 | 16 | 17 | 18 | 19 | 20 | 21 | 22 | 23 | 24 | 25 | 26 | 27 | 28 | 29 | 30 | 31 | 32 | 33 | 34 | 35 | 36 |
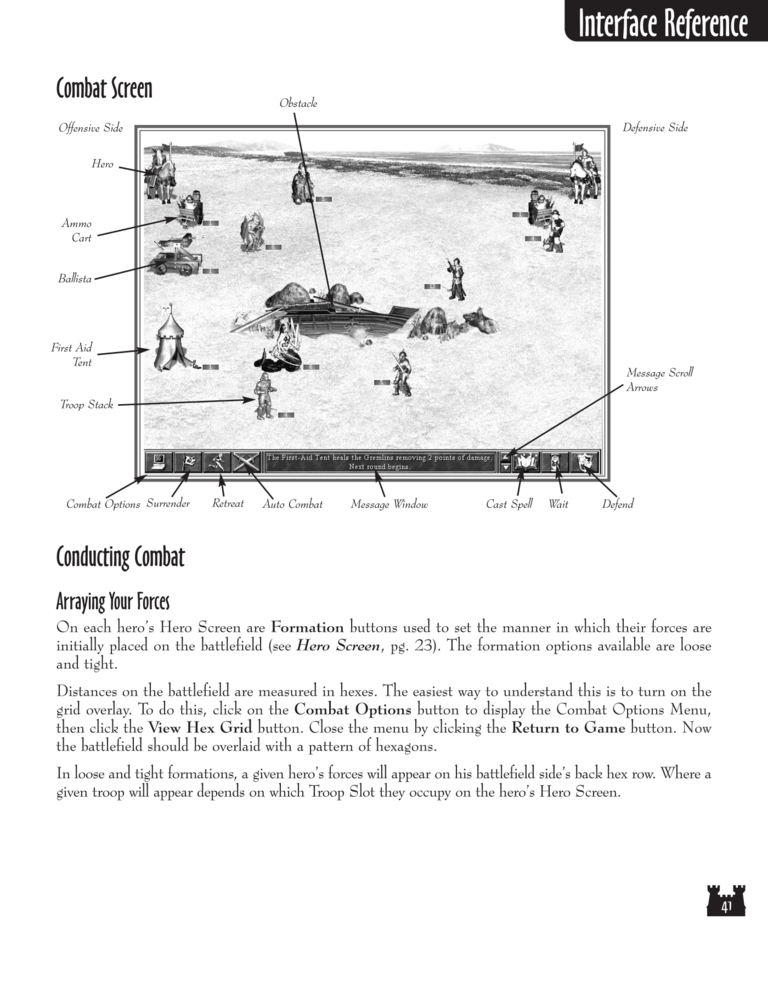
Combat Screen
Obstacle
Defensive Side
Offensive Side
Hero
Ammo
Cart
Ballista
First Aid
Tent
Message Scroll
Arrows
Troop Stack
Combat Options Surrender
Retreat
Auto Combat
Message Window
Cast Spell
Wait
Defend
Conducting Combat
Arraying Your Forces
On each hero's Hero Screen are Formation buttons used to set the manner in which their forces are
initially placed on the battlefield (see Hero Screen, pg. 23). The formation options available are loose
and tight.
Distances on the battlefield are measured in hexes. The easiest way to understand this is to turn on the
grid overlay. To do this, click on the Combat Options button to display the Combat Options Menu,
then click the View Hex Grid button. Close the menu by clicking the Return to Game button. Now
the battlefield should be overlaid with a pattern of hexagons.
In loose and tight formations, a given hero's forces will appear on his battlefield side's back hex row. Where a
given troop will appear depends on which Troop Slot they occupy on the hero's Hero Screen.
