Tutorial Manual Page 6
| Previous page | Next page | Manuals | ||||||||||||||||||||||||||||
|---|---|---|---|---|---|---|---|---|---|---|---|---|---|---|---|---|---|---|---|---|---|---|---|---|---|---|---|---|---|---|
| 1 | 2 | 3 | 4 | 5 | 6 | 7 | 8 | 9 | 10 | 11 | 12 | 1 | Table of contents | 3 | 4 | 5 | 6 | 7 | ||||||||||||
| 8 | 9 | 10 | 11 | 12 | 13 | 14 | 15 | 16 | 17 | 18 | 19 | 20 | 21 | 22 | 23 | 24 | 25 | 26 | 27 | 28 | 29 | 30 | 31 | 32 | 33 | 34 | 35 | 36 | 37 | 38 |
| 39 | 40 | 41 | 42 | 43 | 44 | 45 | 46 | 47 | 48 | 49 | 50 | 51 | 52 | 53 | 54 | 55 | 56 | 57 | 58 | 59 | 60 | 61 | 62 | 63 | 64 | 65 | 66 | 67 | 68 | 69 |
| 70 | 71 | 72 | 73 | 74 | 75 | 76 | 77 | 78 | 79 | 80 | 81 | 82 | 83 | 84 | 85 | 86 | 87 | 88 | 89 | 90 | 91 | 92 | 93 | 94 | 95 | 96 | 97 | 98 | 99 | 100 |
| 101 | 102 | 103 | 104 | 105 | 106 | 107 | 108 | 109 | 110 | 111 | 112 | 113 | 114 | 115 | 116 | 117 | 118 | 119 | 120 | 121 | 122 | 123 | 124 | 125 | 126 | 127 | 128 | 129 | 130 | 131 |
| 132 | 133 | 134 | 135 | 136 | 137 | 138 | 139 | 140 | 141 | 142 | 143 | 144 | Table of contents | 2 | 3 | 4 | 5 | 6 | 7 | 8 | 9 | 10 | ||||||||
| 11 | 12 | 13 | 14 | 15 | 16 | 17 | 18 | 19 | 20 | 21 | 22 | 23 | 24 | 25 | 26 | 27 | 28 | 1 | 2 | Table of contents | 4 | 5 | ||||||||
| 6 | 7 | 8 | 9 | 10 | 11 | 12 | 13 | 14 | 15 | 16 | 17 | 18 | 19 | 20 | 21 | 22 | 23 | 24 | 25 | 26 | 27 | 28 | 29 | 30 | 31 | 32 | 33 | 34 | 35 | 36 |
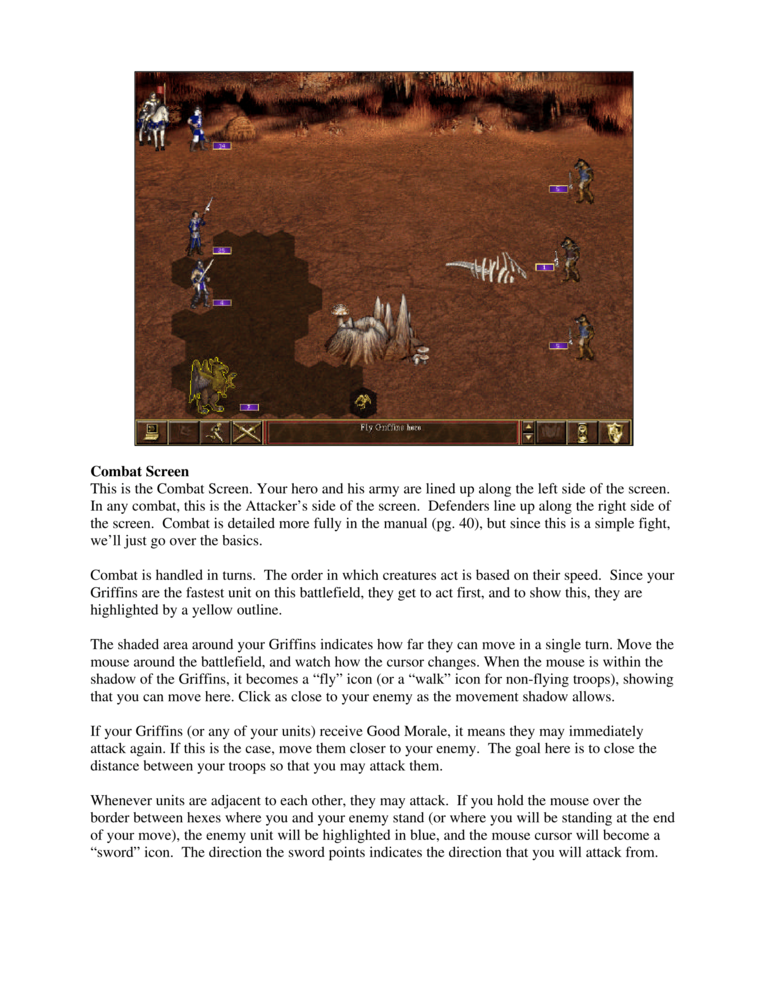
Combat Screen
This is the Combat Screen. Your hero and his army are lined up along the left side of the screen.
In any combat, this is the Attacker’s side of the screen. Defenders line up along the right side of
the screen. Combat is detailed more fully in the manual (pg. 40), but since this is a simple fight,
we’ll just go over the basics.
Combat is handled in turns. The order in which creatures act is based on their speed. Since your
Griffins are the fastest unit on this battlefield, they get to act first, and to show this, they are
highlighted by a yellow outline.
The shaded area around your Griffins indicates how far they can move in a single turn. Move the
mouse around the battlefield, and watch how the cursor changes. When the mouse is within the
shadow of the Griffins, it becomes a “fly” icon (or a “walk” icon for non-flying troops), showing
that you can move here. Click as close to your enemy as the movement shadow allows.
If your Griffins (or any of your units) receive Good Morale, it means they may immediately
attack again. If this is the case, move them closer to your enemy. The goal here is to close the
distance between your troops so that you may attack them.
Whenever units are adjacent to each other, they may attack. If you hold the mouse over the
border between hexes where you and your enemy stand (or where you will be standing at the end
of your move), the enemy unit will be highlighted in blue, and the mouse cursor will become a
“sword” icon. The direction the sword points indicates the direction that you will attack from.
