Tutorial Manual Page 2: Difference between revisions
No edit summary |
m →top: clean up |
||
| (4 intermediate revisions by 2 users not shown) | |||
| Line 1: | Line 1: | ||
{{manual navigational box|tut|prev=1|next=3}} | |||
[[File:Tutorial1_2.png|768px]] | [[File:Tutorial1_2.png|768px]] | ||
| Line 57: | Line 54: | ||
[[Category:Tutorial Manual]] | [[Category:Tutorial Manual|Tutorial Manual 002]] | ||
Latest revision as of 20:56, 7 December 2023
| Previous page | Next page | Manuals | ||||||||||||||||||||||||||||
|---|---|---|---|---|---|---|---|---|---|---|---|---|---|---|---|---|---|---|---|---|---|---|---|---|---|---|---|---|---|---|
| 1 | 2 | 3 | 4 | 5 | 6 | 7 | 8 | 9 | 10 | 11 | 12 | 1 | Table of contents | 3 | 4 | 5 | 6 | 7 | ||||||||||||
| 8 | 9 | 10 | 11 | 12 | 13 | 14 | 15 | 16 | 17 | 18 | 19 | 20 | 21 | 22 | 23 | 24 | 25 | 26 | 27 | 28 | 29 | 30 | 31 | 32 | 33 | 34 | 35 | 36 | 37 | 38 |
| 39 | 40 | 41 | 42 | 43 | 44 | 45 | 46 | 47 | 48 | 49 | 50 | 51 | 52 | 53 | 54 | 55 | 56 | 57 | 58 | 59 | 60 | 61 | 62 | 63 | 64 | 65 | 66 | 67 | 68 | 69 |
| 70 | 71 | 72 | 73 | 74 | 75 | 76 | 77 | 78 | 79 | 80 | 81 | 82 | 83 | 84 | 85 | 86 | 87 | 88 | 89 | 90 | 91 | 92 | 93 | 94 | 95 | 96 | 97 | 98 | 99 | 100 |
| 101 | 102 | 103 | 104 | 105 | 106 | 107 | 108 | 109 | 110 | 111 | 112 | 113 | 114 | 115 | 116 | 117 | 118 | 119 | 120 | 121 | 122 | 123 | 124 | 125 | 126 | 127 | 128 | 129 | 130 | 131 |
| 132 | 133 | 134 | 135 | 136 | 137 | 138 | 139 | 140 | 141 | 142 | 143 | 144 | Table of contents | 2 | 3 | 4 | 5 | 6 | 7 | 8 | 9 | 10 | ||||||||
| 11 | 12 | 13 | 14 | 15 | 16 | 17 | 18 | 19 | 20 | 21 | 22 | 23 | 24 | 25 | 26 | 27 | 28 | 1 | 2 | Table of contents | 4 | 5 | ||||||||
| 6 | 7 | 8 | 9 | 10 | 11 | 12 | 13 | 14 | 15 | 16 | 17 | 18 | 19 | 20 | 21 | 22 | 23 | 24 | 25 | 26 | 27 | 28 | 29 | 30 | 31 | 32 | 33 | 34 | 35 | 36 |
because until you send a hero to explore an area you won’t know what is there. Don’t worry
about any of the other buttons below the World Map, these will be described in greater detail
later.
Your first hero, Lord Haart, should already be selected (he’s sitting on his horse, waiting for
instructions). The first thing we’ll want him to do is visit the town, so place your mouse cursor
over the entrance to the town (between the two flag poles). Notice how the horse icon rears up
on its hind legs – this means that by traveling to that location, your hero will interact with
whatever is there. Also, the name and a short description of the location appears in the Rollover
Bar at the bottom of the screen (the rollover bar appears on nearly every screen in Heroes III and
gives useful, context sensitive information). When you click on a location, a set of green arrows
show the path your hero will take to reach the large green X. It is this X that marks your hero’s
destination. Click again on the same location and your hero will move to the castle (a fast way to
move is to simply double click on an intended destination – the first click selects the path, the
second click sends the hero). When the hero arrives at the entrance to the town, the view will
change to the Town Screen.
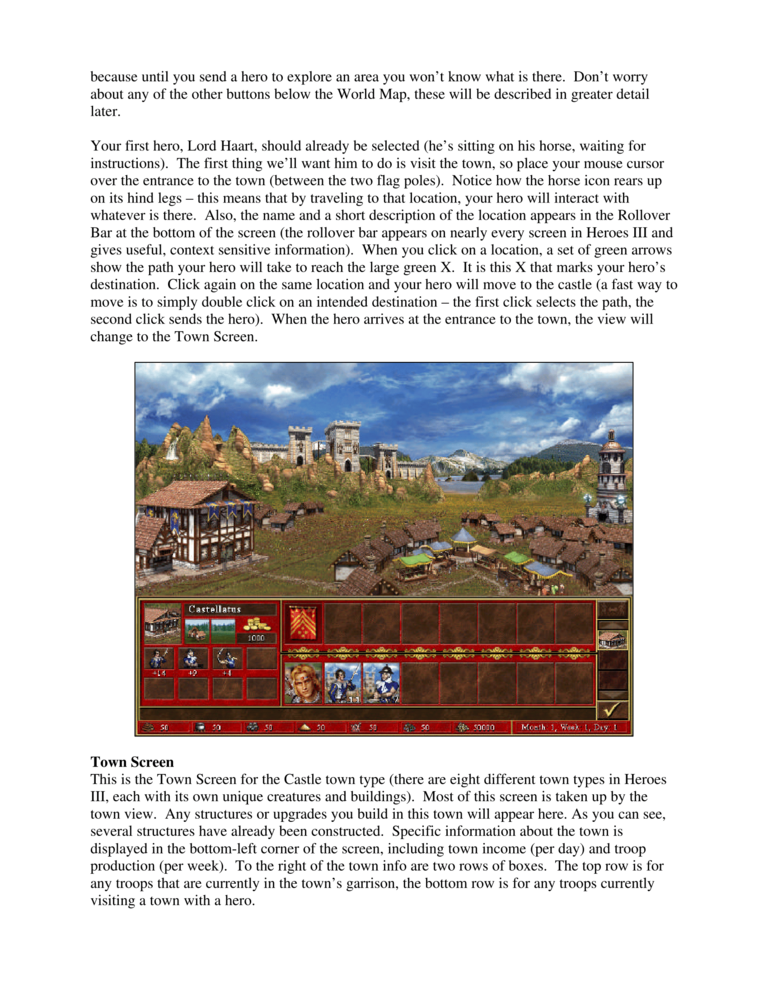
Town Screen
This is the Town Screen for the Castle town type (there are eight different town types in Heroes
III, each with its own unique creatures and buildings). Most of this screen is taken up by the
town view. Any structures or upgrades you build in this town will appear here. As you can see,
several structures have already been constructed. Specific information about the town is
displayed in the bottom-left corner of the screen, including town income (per day) and troop
production (per week). To the right of the town info are two rows of boxes. The top row is for
any troops that are currently in the town’s garrison, the bottom row is for any troops currently
visiting a town with a hero.
